How to Make Marbleized Easter Eggs

Use an easy, two-step process to make Marbleized Easter Eggs, using oil, vinegar and food colouring!
This is the one of the coolest ways to dye Easter Eggs. All you need are eggs, olive oil, vinegar and food colouring. The process is really easy; you just dip your eggs in food colouring and water to dye them, and then dip them again in an oil and coloured water solution to marble them! It’s so simple, and the effect is gorgeous!
I first made marbled Easter eggs this way about 30 years ago. Good Lord! I can’t believe it was that long ago!
At the time, I marbled several eggs, popped them into a little basket, and gave them to my Nana, along with a card one year at Easter. The eggs had been blown out so they could be preserved, but I really didn’t expect her to keep them much past Easter.
Well, she did.
She displayed that little basket of coloured eggs on her bedroom dresser until she moved into a nursing home some 15 years later. Every time I saw those eggs, I was touched to think that she treasured them so.

I don’t remember where I learned about marbling eggs because it was so long ago. I must’ve seen it in a magazine because we sure didn’t have the internet back then.
I’d actually forgotten all about the process until I saw these Galaxy Easter Eggs by Dream a Little Bigger a few weeks ago. The process for making galaxy eggs is completely different than the process for marbling eggs, but they’re super-cool, and when I saw them, I thought “Hey! I know how to make some super-cool Easter eggs too!”
Yesterday afternoon I dug out my old recipe book where I had the marbling process scribbled down and tucked away. Then I set out to make a bunch of marbleized eggs, hoping they’d be as amazing as I remembered.
They were! I was thrilled with how my eggs turned out! And I’m so excited to show YOU how to make some of your own.
How to Make Marbled Easter Eggs:
Supplies
- eggs (I blew my eggs out first – see instructions below)
- food colouring (I use icing gels, but liquid colouring works too)
- olive oil
- vinegar
- water
- a small drinking glass and a few small bowls
- a cooling rack
- wooden skewer (this is optional – you could just use a spoon or fork for handling your eggs)
First, you need to decide if you’re using whole eggs or hollow eggs (so they can be preserved). If you’re using hollow eggs, you need to blow out the insides.
Here’s how I do it:
How to blow out an egg:
Use a thumbtack to poke a hole in each end of your egg. Poke a wooden skewer into the holes to make them a little larger.
Next, holding the egg over a bowl, blow into one of the holes, forcing the white of the egg and the yolk out the other end. This can be a real work-out for your lips and cheeks. If you have trouble blowing the yolk and egg white out, use the skewer to make your holes a bit bigger.
When your eggs have been completely emptied, give them a rinse, and dry them gently.
First step – colour your eggs.
Step 1. Dying your eggs a solid colour:
Before you marbleize your eggs, you must first dye them a solid colour.
In a small drinking glass, mix 1 cup of very hot water with some food colouring and 1 tsp of vinegar.
*If you’re using liquid colouring, I would start with about 10 drops of colour. You can always add more while your eggs are soaking. If you’re using icing gels, scoop a small dollop of gel with a toothpick, and stir that into the water until it dissolves.
Now, submerge an egg into the coloured water. I used the wooden skewer to keep the egg under the water. I just stuck the skewer into one of the holes, and gently pushed the the egg to the bottom of the glass, and held it there for several minutes.
When you’re happy with the colour of your egg, remove it from the water, and set it on the cooling rack to dry for 10 minutes or so.
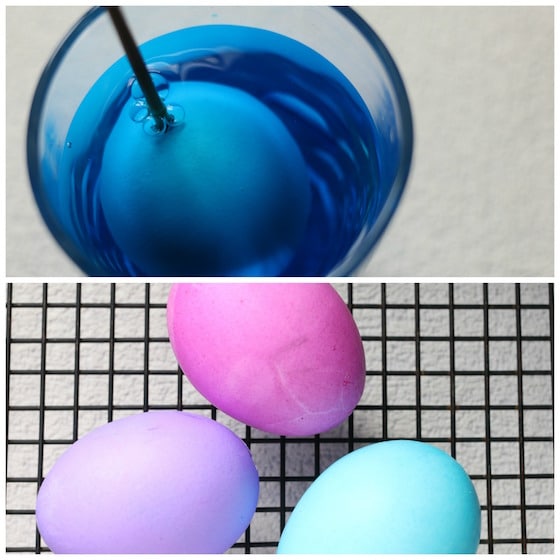
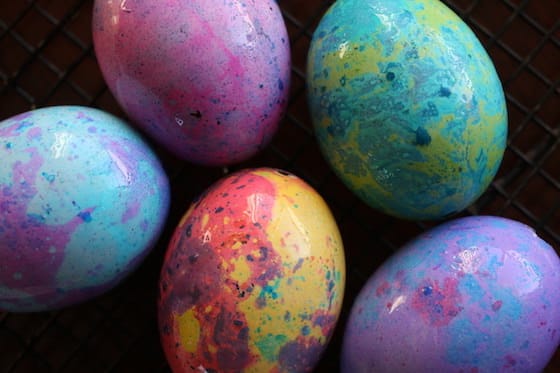
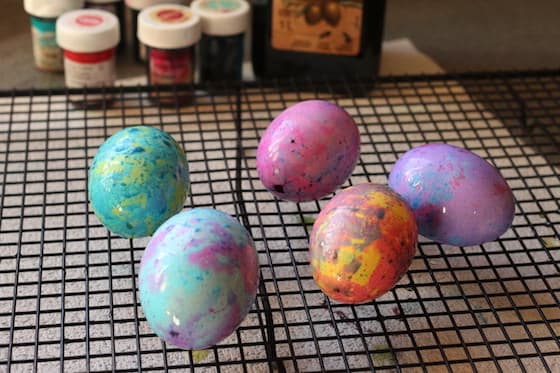
Look at these colours. Aren’t they gorgeous?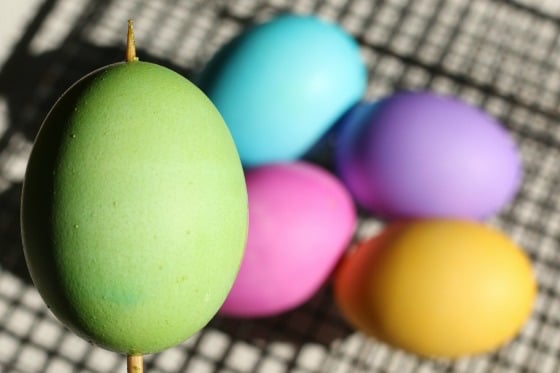
When all of your eggs have been dyed a solid colour, you can move on to the marbleizing process.
Step 2. How to Marble Your Eggs:
To marbleize your eggs, fill a small bowl or container with about an inch of fresh water.
Choose the colour that you want to marble your egg with. You’ll want this colour to be darker than the solid colour of your egg. Stir in a generous amount of this second colour. Don’t skimp here. The water should be much darker than it was for your first round of colouring.
Add 1 tbsp of olive oil to the water, and gently stir to create swirls and bubbles on top of the water.
Now, place a coloured egg into the oily water. Roll the egg around in the water, holding it in place for a few seconds here and there to allow the egg to absorb some of this second colour. The longer you roll your egg around in the oil, the more marbled your eggs will be.
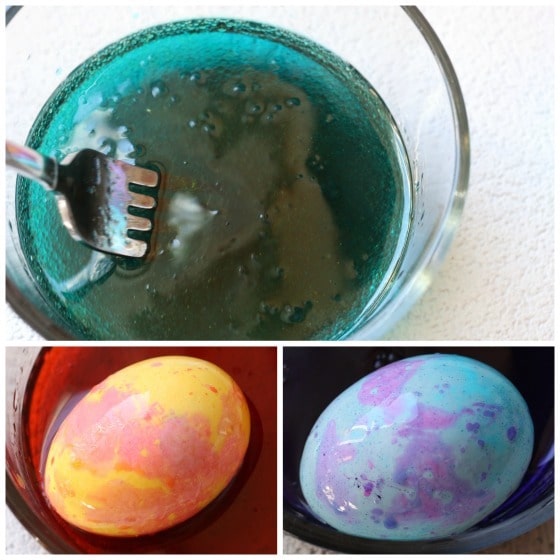
Remove your beautiful marbled egg from the water, and place it on a drying rack.
You can repeat this process in as many colours of oil/coloured water as you like.
For my eggs today, I marbleized with two colours.
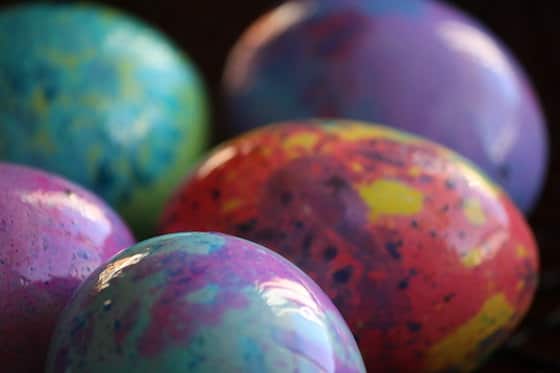
Aren’t they gorgeous?
To finish, wipe each egg gently with a paper towel to remove any excess oil.

Place them in a bowl or a glass vase and display your gorgeous marbleized eggs for Easter.

More cool ways to dye Easter Eggs:
Tie Dyed Eggs with Sharpies and Rubbing Alcohol
Marbleizing with Shaving Cream and Food Colouring
Liquid Water Colour Easter Eggs
Get the 3-5 Playful Preschool e-Book!
25+preschool activities by 25 bloggers, 10 printables, 50 links to activities not featured in the book all for $8.99!
Download your copy today:

Follow the Hooligans on Facebook

Jackie is a mom, wife, home daycare provider, and the creative spirit behind Happy Hooligans. She specializes in kids’ crafts and activities, easy recipes, and parenting. She began blogging in 2011, and today, Happy Hooligans inspires more than 2 million parents, caregivers and Early Years Professionals all over the globe.


