How to Make Butter in 3 Easy Steps

Learn how to make butter in minutes with this amazing and simple science activity. All you need is cream, a jar, and some elbow grease. Easy recipe for home or the classroom, and a fun, edible experiment for kids of all ages.
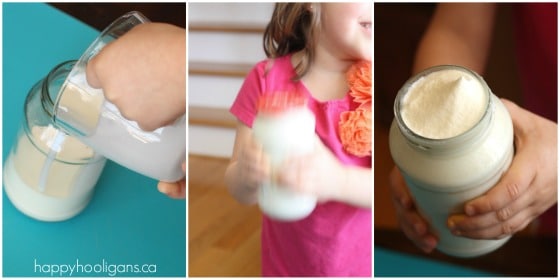
Grab a jar and some whipping cream. I’m going to show you how to make homemade butter with your kids today. The process is really fun and easy and it will fascinate all ages!
Nothing tastes better than homemade butter! Whether you slather it on a piece of homemade bread, a muffin or a dinner roll, you just can’t beat the taste of butter you’ve made yourself.
Making Butter is a Great Science Lesson for Kids
Making your own butter couldn’t be easier! It’s so easy, in fact, making homemade butter is one of those classic science activities that teachers do in the classroom with their students. All you need is a carton of cream and a glass jar!
Oh, and a little elbow grease. That’s the fun part. You’re going to shake, shake, shake your way to your batch of tasty homemade butter, and that does require a bit of muscle.
You can do it though! Heck, even my preschoolers can handle this experiment!

To Make Homemade Butter, You’ll Need:

Ingredients and Supplies:
- a glass jar with a lid
- heavy cream (35% whipping cream)
- 2 or 3 glass marbles (optional)
Please note that the marbles are optional. I do not use them, but others say it speeds up the process because they provide extra agitation for the cream. If you use the marbles, make sure your glass jar is made from thick tempered glass i.e. a Mason jar. You wouldn’t want the marbles to break the glass.
How to Make Homemade Butter in a Jar
Step One: Fill your jar half way with cream. If you’re using marbles to speed up the process, drop them in now.
Step Two: Put the lid on tightly and SHAKE it like crazy!
After a minute or two, the cream will thicken, and you won’t hear liquid sloshing around anymore. You can read the scientific explanation for what’s happening here.
Keep shaking.
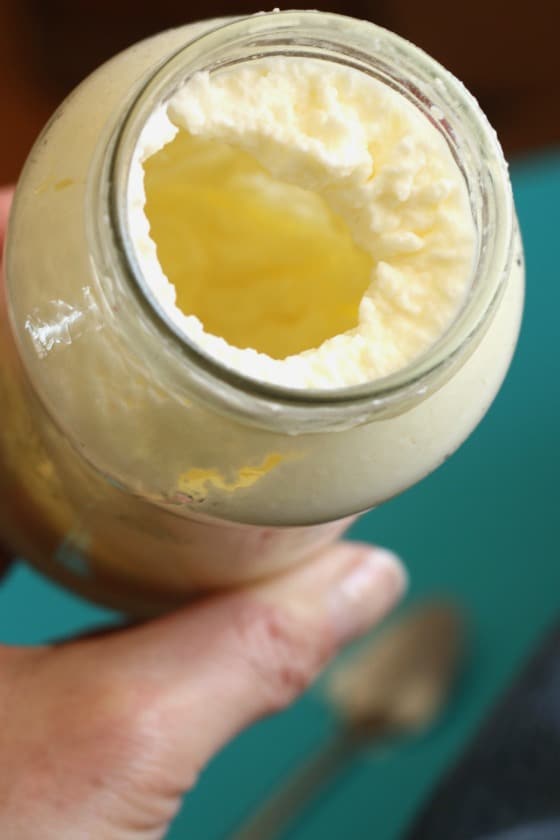
As the Cream thickens, you get Whipped Cream!
About halfway through, I take the lid off to show the kids what’s happening inside the jar. The cream has turned into whipped cream! And yes, we grab a spoon, and taste some.
Pop the lid back on, and keep shaking. After a few more minutes, you’ll hear liquid sloshing around in the jar again. The first time I made butter, I thought something had gone wrong, and that the whipped cream had thinned back into cream.
Buttermilk!
But a peak inside will reveal that the sloshing is the buttermilk separating from the butter that’s starting to solidify in the jar.
Almost ready!
Once again, pop the lid back on, and shake it for another minute or so, until the butter has formed a solid mass.
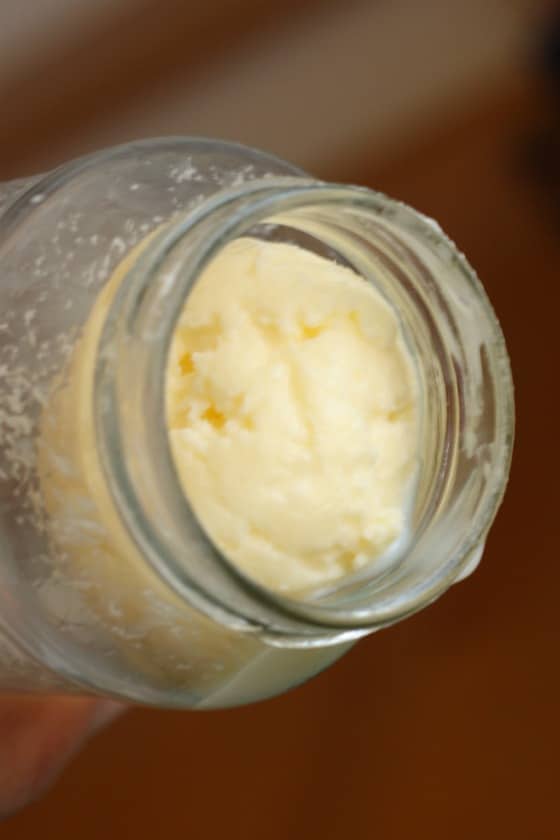
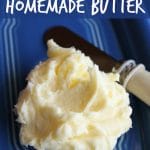
We made BUTTER!
Pour off the buttermilk, and shake the butter out of the jar.
Be sure to save your buttermilk for baking.
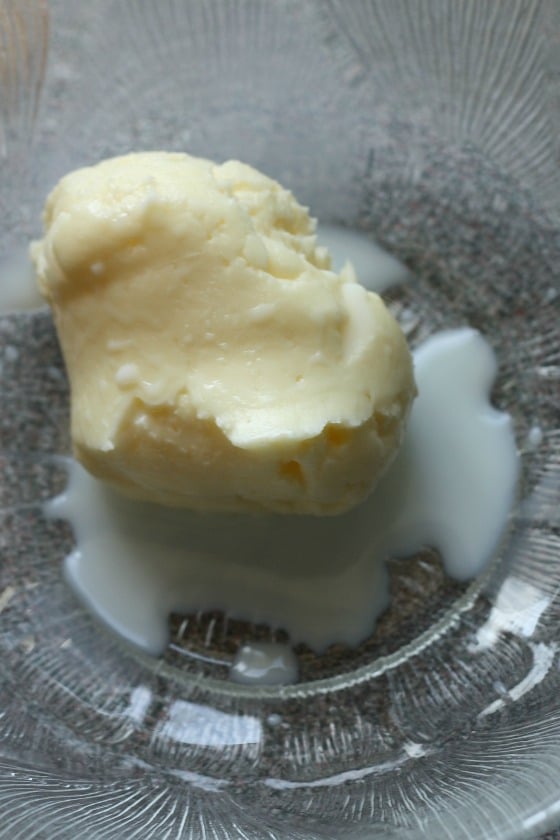
Rinse your Butter:
Step 3: To finish, you need to rinse your butter under cold water. Knead it a little as you rinse. This will remove the last of the buttermilk and will prevent your butter from going rancid quickly.
Time for a taste-test!
We slathered our light and fluffy homemade butter on toast.
Mmmmm!
I’m telling’ ya… Homemade butter is out of this world!

If you like, you can add a dash of salt, or you can flavour your butter with citrus zest of freshly chopped herbs.
Check out this collection of homemade flavoured butter recipes by A Taste of Home.
And if you really want to impress your family, bake some bread machine dinner rolls to spread your butter on.
Common questions about making homemade butter:
Can I make butter from milk?
You can’t make butter from the milk that’s likely in your milk jug in the fridge right now, but you can apparently make it from fresh, un-pasteurized cow’s milk (also known as raw milk). It is a bit of a lengthy process as the milk has to sit overnight, but if it interests you, you can visit Mother Earth News for the instructions.
What’s the easiest way to make homemade butter?
Ok, sure, making butter in a jar requires a bit of elbow grease and a lot of shaking. If you’re not up for that task, or if you want to make butter more quickly, there are a couple of ways to do it:
Using a butter shaker is faster and easier:
Check out this butter shaker (affiliate link) from Amazon. You can make butter in 3 minutes with it.
How to make butter with a stand mixer:
Of course, making butter in your mixer is a snap! Just pop over to A Little Insanity for the easy instructions.
How long can I store homemade butter:
Homemade butter won’t keep for long because there are no preservatives in it. It will spoil quickly if left at room temperature, but will keep well for a few days in the fridge.
Homemade Peanut Butter Next!
Hope you enjoy this delicious homemade butter as much as we do! Next, I think the hooligans and I will attempt making homemade peanut butter! We’ll let you know how it goes!
Print Recipe
Pin Recipe
Rate this Recipe
How to Make Homemade Butter In a Jar
Homemade butter that’s rich and creamy and made in the funnest way possible! This classic process for making homemade butter in a jar is always a hit with the kids.
Servings: 10
Calories: 100kcal
Ingredients
- 35 % m.f. cream also known as heavy cream or whipping cream
- jar with a lid
Instructions
-
Fill your jar half-way with cream.
-
Pop the lid on, and start shaking.
-
When the sloshing sounds stop, remove the lid, and check for whipped cream!
-
Pop the lid back on, and continue to shake until the mixture separates into buttermilk and butter.
-
Remove lump of butter (save the buttermilk for baking).
-
Rinse butter under cold water, kneading any buttermilk out of the butter.
-
Stir in a dash of salt if you wish.
-
Your butter won’t keep for long because there are no preservatives. If you’re not eating all of it the first day, store in the fridge for another day or two.
-
Store in the fridge if keeping for more than one day.
Nutrition
Calories: 100kcal | Fat: 1g | Cholesterol: 4mg | Sodium: 1mg | Vitamin A: 50IU | Calcium: 2mg
More cool science activities for kids:
Get the 3-5 Playful Preschool e-Book!
25+preschool activities by 25 bloggers, 10 printables, plus links to 50 additional crafts and activities all for $8.99!
Download your copy today:

Follow the Hooligans on Facebook

Jackie is a mom, wife, home daycare provider, and the creative spirit behind Happy Hooligans. She specializes in kids’ crafts and activities, easy recipes, and parenting. She began blogging in 2011, and today, Happy Hooligans inspires more than 2 million parents, caregivers and Early Years Professionals all over the globe.


")
