DIY Wind Chimes – Gorgeous, Recycled Craft for Kids to Make

These Plastic Bottle Wind Chimes will add a burst of colour to any outdoor play space or patio! All you need is a plastic bottle, paint, yarn and buttons!
We LOVE making homemade wind chimes here in my home daycare. We’ve made so many different sets for the hooligans to give to their parents, and also to hang in the backyard here at my daycare.
These particular chimes were a collaborative project. We all worked on them and then we hung them in our back yard play space, right beside our playhouse.

I love that these wind chimes were made using recyclables and craft items that we had on hand. We love crafting with stuff we already have around the house, don’t you?
Grab a plastic bottle, and hit the craft cupboards! It’s time to gather your supplies!
To make our Plastic Bottle Wind Chimes, you’ll need:
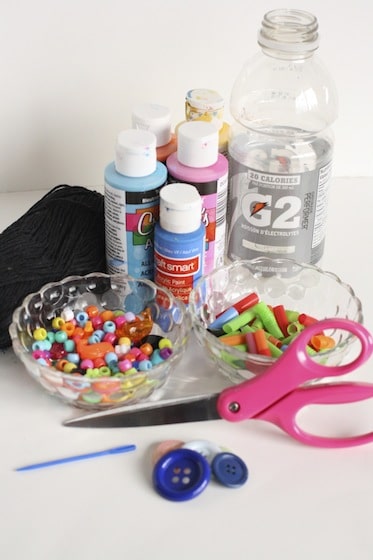
Supplies
*If you’re using yarn for your chimes, I would recommend using a synthetic yarn (i.e. acrylic), as it will be much more durable than a cotton.
Making our wind chimes:
To start, I cut cut off the tapered, top portion of the plastic bottle.
Then one little hooligan painted the each section of the bottle a different colour.
When the paint was dry, I punched some evenly-spaced holes around the bottom of the bottle. I wasn’t sure how many strands of beads (or chimes) we were going to make, so I punched 8 holes.
We ended up only using 4 of them.
A coat of craft varnish gives it some shine and will help protect your homemade wind chime from the elements.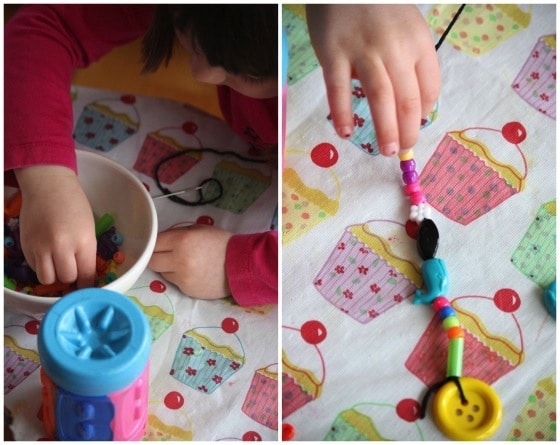
Stringing our beaded chimes:
We made 4 outer chimes and 1 inner chime.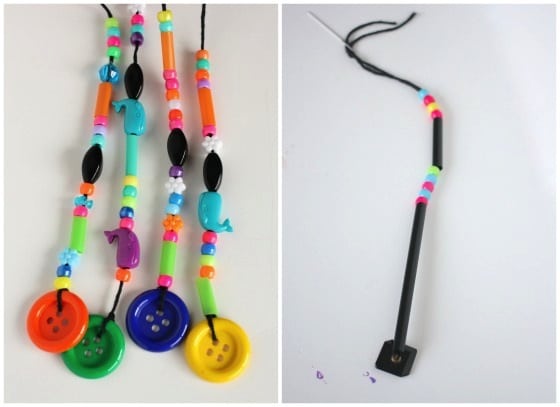
For the outer chimes, I gave each of the hooligans a piece of black yarn which they loaded up with lots of colourful plastic beads. I encouraged the hooligans to put a large black bead in the middle of their chimes, for weight and sound, but otherwise, the bead and colour choices were their own.
While the hooligans beaded their 4 outer chimes, I worked on the inner stand of beads.
For the inner chime, I threaded a flat black button (with a hook on the back) on to a long length of yarn. Then I doubled the yarn back, threaded both ends through a needle, and filled the length of yarn with sections of black straws and coloured beads.
Leaving a few inches of space at the top of each strand of yarn, I slipped each one through a punched hole, and knotted it in place.
Attaching the center chime:
To attach the center chime, I had to make a hole in the top of the bottle.
In hind-sight, I should’ve just drilled a small hole – it would’ve been MUCH faster, but I was too “lazy” to find the drill (my husband has a tendency to not put things back where they belong), so I spent about 15 minutes twisting a very small screw driver ’round and ’round and ’round until it FINALLY poked through the plastic. I think you could probably heat the end of a skewer and it might push through the plastic quite easily, but I didn’t think of that until after.
Once I had the hole in the bottle, I poked the yarn for the centre chime through the hole, but there’s something you need to know before you do that:
You need some “stoppers”!
You need a stopper on the inside and outside of the bottle to prevent that centre chime from sliding up and down through the hole, so this is what I did:
I knotted the yarn a couple of inches down from the top. This would be the stopper INSIDE the bottle. See what I mean?
Then I threaded the yarn through the hole, and slipped it through a pony bead, knotted the bead in place, and tied a loop for hanging.
You could hang your wind chime using this loop, but just for fun, I added a metal key ring.

Tada!!
Then we headed out into the yard to find a place to hang our gorgeous homemade wind chimes!
We decided on a tree back beside our sandbox and play house, where we can enjoy them when we’re playing in the backyard.

Aren’t they beautiful? Don’t you think our DIY wind chimes would make a great homemade Mother’s Day gift?
What if you don’t have a plastic bottle?
Not a problem! Head on over to Rainy Day Mum to see how they made their simple wind chimes using a common household item!

**Update: It’s been almost exactly 2 years since we made these wind chimes and hung them in our backyard. I’m happy to say they’re still tinkling in the wind, and looking just as good as they did when we we first made them!
More recycled crafts for kids
Summer Stars – Gorgeous Twig Decoration for the Patio
Easy, Recycled Water Wall
Rainbow Stick Wood Chimes
2 Minute Twirling Ribbon Sticks
Gorgeous Paper Mache Bowls
Beautiful Bookmarks with Sharpies & Rubbing Alcohol
Follow the Hooligans on Facebook

Jackie is a mom, wife, home daycare provider, and the creative spirit behind Happy Hooligans. She specializes in kids’ crafts and activities, easy recipes, and parenting. She began blogging in 2011, and today, Happy Hooligans inspires more than 2 million parents, caregivers and Early Years Professionals all over the globe.


