Valentines Ice Melting Activity – Happy Hooligans

Set up a Valentines Ice Melting Activity for kids with just ice, salt and liquid watercolours. It’s a great science experiment for young children and it doubles as a Valentines activity when you use a heart shaped pan to make your ice and appropriately coloured watercolours to melt the ice with.
One of the hooligans favourite science activities is melting a block of ice with salt and water. It’s fun and fascinating and it keeps my preschoolers busy for ages.
Today we’re doing this experiment as a Valentine’s activity so we’ve used a heart-shaped ice block.
We’ve done plenty of melting ice experiments before, but this was the first time we’ve included liquid watercolours in the experiment.
I’m so glad we did! The effects were gorgeous!

For your convenience, I’ve included Affiliate links in this post.
About our liquid watercolours
In case you’ve never heard about them, let me tell you how much I LOVE our liquid watercolours.
Before I discovered them, I always used food colouring for these kinds of activities. The trouble with food colouring is it stains hands, clothing and your work surface.

Liquid watercolours are amazing. They’re washable, they last for ages, and the colours are vibrant and gorgeous.
I generally add one or two drops to a section of an ice cube tray and then fill the tray with water, but I can control the intensity of the colour by adding either a little more water or another drop of watercolour.
They’re fantastic and you can use them for so many different crafts and activities. To get an idea, check out our Colour Fizz Activity, our Marbled Paper Activity and our Tie Dyed Father’s Day Cards.
Use a muffin tin to make many ice blocks
If you’re doing this as a Valentine’s activity, like we did, freeze your ice in a heart-shaped cake pan. If you’re working with a large group of kids, you could make a bunch of ice blocks in a muffin tin.
Supplies required for melting ice with salt and watercolours:

- cake pan
- Liquid Watercolor Paint
- salt (we used table salt and driveway salt)
- paint brushes, small spoons
- ice cube tray
- bowl of warm water
- shallow baking dish
- plastic tablecloth or towels (to protect work area)
Make your ice ahead of time:
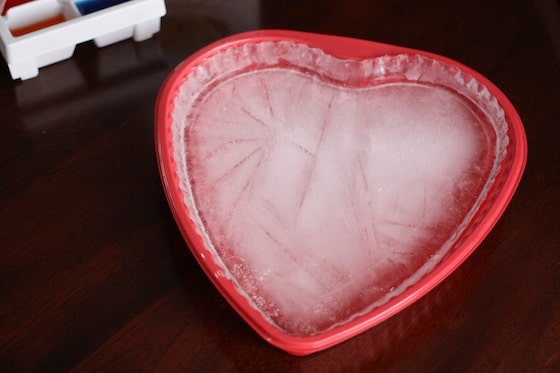
We’re experiencing a deep-freeze a the moment. The temperature here last night was -25 so I filled my cake pans and set them out on the deck overnight. They were rock solid by morning! If you’re using your freezer, I would suggest setting your cake pan(s) on a baking sheet to prevent any spills as you set them into your freezer.
Now the fun begins!
I placed each heart in a baking dish to contain the melting. A vinyl table-cloth protected the coffee-table from any drips or spills. Each hooligan had her own tray of water colours, some paintbrushes, a small spoon and a bowl of very warm water for science discoveries.
Sprinkle the salt on your ice
I poured some salt into directly into the trays of watercolours, and I also sprinkled a generous amount of salt over each heart.
What’s happening?
The ice made lots of loud popping and cracking noises.
This was the perfect opportunity to talk about the chemical reaction that was occurring, and how salt affects the melting point of ice. Simply talking about science is a wonderful experience for preschoolers.
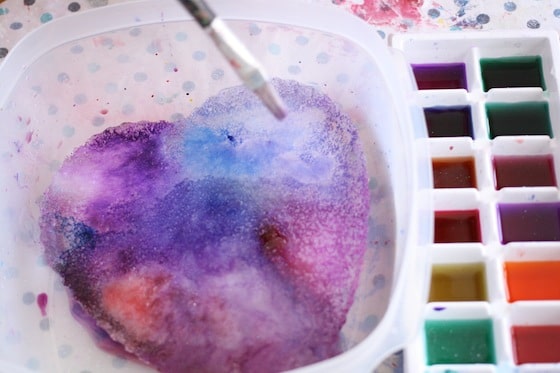
The girls got straight to work “painting” their hearts with their salty watercolours.
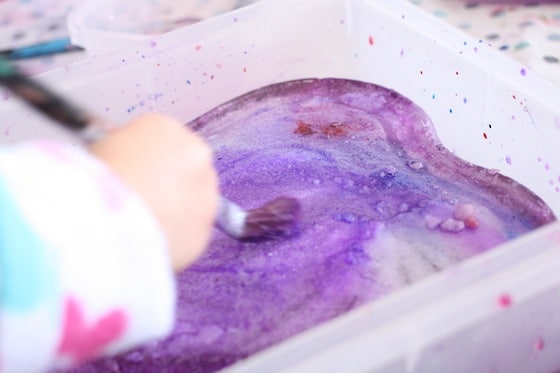
This process was completely experimental for all of us. We normally do these ice-melting activities outside in hot temperatures, but the process was much slower inside in winter-time, so I frequently sprinkled more salt on the hearts, and occasionally I would drip more full-strength watercolours onto the ice to intensify the colours.
At one point I decided to add driveway salt to see if that would speed up the process.
It didn’t, but it added a beautiful element to the activity, and the girls like scrubbing it around, scraping it into the water, and using their spoons to scoop it back onto their hearts.

As the ice melted, cracks and crevices formed, and the watercolours seeped in and coloured them.

All in all, we were at it for over an hour.
The process was gradual and beautiful, and we eventually reduced our hearts to small pieces of ice swimming in a sea of purple water. What a great indoor activity for a cold, winter day!
You may also like:
Follow the Hooligans on Facebook

Jackie is a mom, wife, home daycare provider, and the creative spirit behind Happy Hooligans. She specializes in kids’ crafts and activities, easy recipes, and parenting. She began blogging in 2011, and today, Happy Hooligans inspires more than 2 million parents, caregivers and Early Years Professionals all over the globe.
")


